Authentication by IP Ranges
Overview
This integration allows automatic authentication for specific users based on their originating IP address. Our platform validates the user's IP against configured allowed IPs or ranges, enabling seamless access without manual login.
Admin Role Limitation – click to expand
Authentication methods based on IP, URL referrer, LTI, or SAML are designed for end-user access only.
When the identifier corresponds to an administrator account, the platform intentionally starts the session with regular user permissions to prevent privilege escalation.
Administrators who need to access the Control Panel must:
- Set a password to their account.
- Log out of the current integration-based session.
- Log back in using email + password to regain full administrator privileges.
Customers can provide individual IPs or IP ranges from which their users will access the store. This feature supports two modes:
- Direct: Users access from a controlled physical location (e.g., university network).
- Proxy: Users access remotely through a configured proxy (e.g., EZProxy).
Pre-requisites
The following requirements must be met to use this feature:
- You must be an Enterprise plan subscriber.
How It Works
When a user accesses the store from a configured IP address or range, the system checks this address against the allowed list. If a match is found, the user is authenticated automatically without needing to log in manually.
The system supports both direct IP authentication and proxy-based authentication, allowing access from non-direct locations via known proxy IPs.
Our authentication service:
- Validates IPs against configured ranges (per user or entry point)
- Authenticates users automatically
- Stores session metadata to track the automatic login source
- Records activity logs with the matched IP and range
- Can automatically create new user accounts when needed
Configuration Methods
There are two ways to assign IP authentication:
- User-Based Assignment: Assign IPs or ranges directly to a user. Note that with this method, all users accessing from the configured IP ranges will be authenticated as the same user account, meaning reading statistics cannot be individualized. For individual user statistics, use the Entry Point-Based Assignment method instead.
- Entry Point-Based Assignment: Assign IPs or ranges to an Entry Point and authenticate users using email headers
User-Based Assignment
For both direct and proxy methods, the system requires the IP or IP ranges from where users are expected to connect. If using a proxy, you'll need to configure the proxy's IP.
Steps to configure:
- Go to
Control Panel > Users - Create a new user or select an existing one
- Set the IP or IP ranges using the option
Assign IP rangesin the dropdown menu
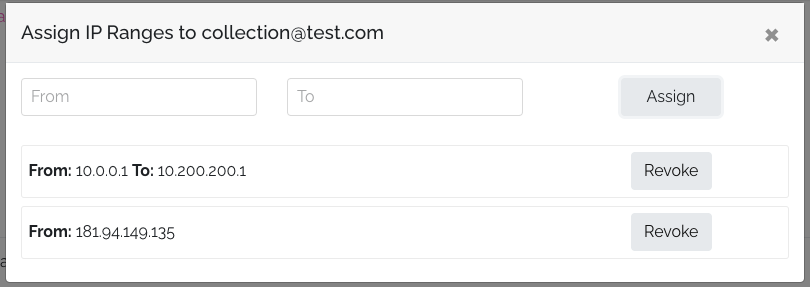
To add a single IP, enter it in the "From" field and press the assign button, leaving "To" empty. For an IP range (e.g., all IPs between 10.0.0.1 to 10.200.200.255), set "From: 10.0.0.1" and "To: 10.200.200.255". Any user connecting from an IP within that range will be automatically logged in.
Entry Point-Based Assignment
This method allows you to assign IPs or ranges to a specific entry point, which can authenticate users based on their IP address.
Steps to configure:
-
Navigate to
Settings > Integrations -
Create a new Entry Point for IP Login or select an existing one
-
Use the
Assign IP rangesoption to set the IP or IP ranges -
Configure content access by choosing one of two options:
- Direct access to all content: Grant access to all store content
- Assign a plan: Select a specific plan to assign to users For entry point-based authentication, the system requires the following:
-
A valid IP address or range that matches the configured entry point
-
At least one identity header:
X-Usernamewith the user's email address, orX-External-Idwith an institutional identifier, such as a national id number, when the proxy does not know the user's email. Up to 200 characters.
When a request comes from an authorized IP with one or both headers:
- The reader is looked up by
X-External-Idfirst, then byX-Username. If neither matches an existing account, one is created from the values the request carries, and an account created fromX-External-Idalone has no email address. - If the account is found by email and has no external id yet, the external id is attached to it. This links readers that were created from the dashboard beforehand.
- An invalid value is ignored and the other header is used. The request is rejected only when neither header carries a usable value.
- Access is granted based on the entry point configuration (direct access or plan).
The external id identifies one account, so two entry points that send the same identifier resolve to the same reader.
This allows organizations to authenticate users individually while still using IP-based access control.
Important Distinction Between Access Methods
When configuring an entry point, administrators have two options for providing content access:
-
Direct access to all content: This access is limited to the user's browser session only. Users authenticated this way will not have access through mobile or desktop applications. The access is temporary and tied to their web browser session.
-
Plan assignment: When you assign a plan to the entry point (which may also give access to all content), the user receives permanent access credentials. This allows them to access content not only through the web browser but also through mobile and desktop applications.
Choose the appropriate method based on your requirements for user mobility and access persistence.
Implementation
Automatic Authentication
The most streamlined approach is to let users be authenticated automatically when they access protected content:
- Users connecting from configured IP ranges will be automatically authenticated when accessing the library section (
/library), a publication page, or the reader - Users can manually log out if needed and log in with different credentials
- Automatic login will trigger again when navigating back to protected content
On-Demand Authentication (Legacy Method)
For implementations using the legacy method:
- Create a button or hyperlink
- Set the route to
https://{store_final_domain}/auth/ip
<a href="https://{store_final_domain}/auth/ip">Login User</a>
<button type="button" onclick="loginUser()">Login User</button>

<script>
  function loginUser() {
    window.location.href = 'https://{store_final_domain}/auth/ip';
  }
</script>
- To redirect users to a specific URL after authentication, use the
intended_urlparameter:
<a
  href="https://{store_final_domain}/auth/ip?intended_url=https://{store_final_domain}/reader/publication-name"
  >Login User</a
>
Proxy Configuration
For proxy implementations, you must first configure the stanza. This is particularly important for EZProxy configurations.
HTTPMethod values are necessary for secure connections between the proxy and our server.
Example stanza configuration:
Title Publicala Editions
HTTPHeader -request -process X-XSRF-TOKEN
HTTPHeader -request -process X-CSRF-TOKEN
HTTPMethod PUT
HTTPMethod PATCH
HTTPMethod DELETE
HTTPMethod OPTIONS
HTTPMethod TRACE
HTTPMethod CONNECT
URL app.publica.la/auth/ip
HJ app.publica.la
DJ app.publica.la
After configuring the stanza, follow the steps for direct configuration, adjusting for proxy implementation.
Troubleshooting
Common issues include:
- Incorrect IP or IP range configuration
- Users connecting from non-configured IP addresses
In these cases, users will see the login form instead of being automatically authenticated.
To troubleshoot, add ?debug=true to the URL:
https://{store_final_domain}/auth/ip?debug=true
This will display information about the connecting IP address and configured ranges, helping identify configuration issues:

When using entry point authentication, the debug screen lists the request headers, so you can confirm that X-Username or X-External-Id is being sent and check the value it carries.
Tip: You can use tools like IP location to determine IP addresses for configuration. Alternatively, add a console alias with
alias ip="curl icanhazip.com"and runipto see your current IP.